One Heck of a Home Lan
Introduction⌗
Back in June of 2019, a friend of me came to me with something of an interesting project: How would one connect everyone on his property to the Internet. His home had been destroyed in the 2007 Tubbs fire and he was now trying work with some friends to rebuild. The project seems seems simple enough, but actually doing it is more complicated than your typical home network. I had to cover multiple buildings that are separated over hundreds of feet at full gigabit speed. I also had to deal with shifting physical and network requirements and even being interrupted by yet another wildfire.
Planning And Requirements⌗
After the Tubbs fire, AT&T rebuilt their destroyed landline phone lines in the area with fiber to the home. This allowed them to offer gigabit-class home Internet to areas burned. This gave me my first requirement: At least gigabit-class speed to the Internet. Given that there are multiple users on the network at once, we may end up using all that throughput at least some of the time, possibly through multiple connections. I didn’t want my home network gear to be the bottleneck to the Internet.
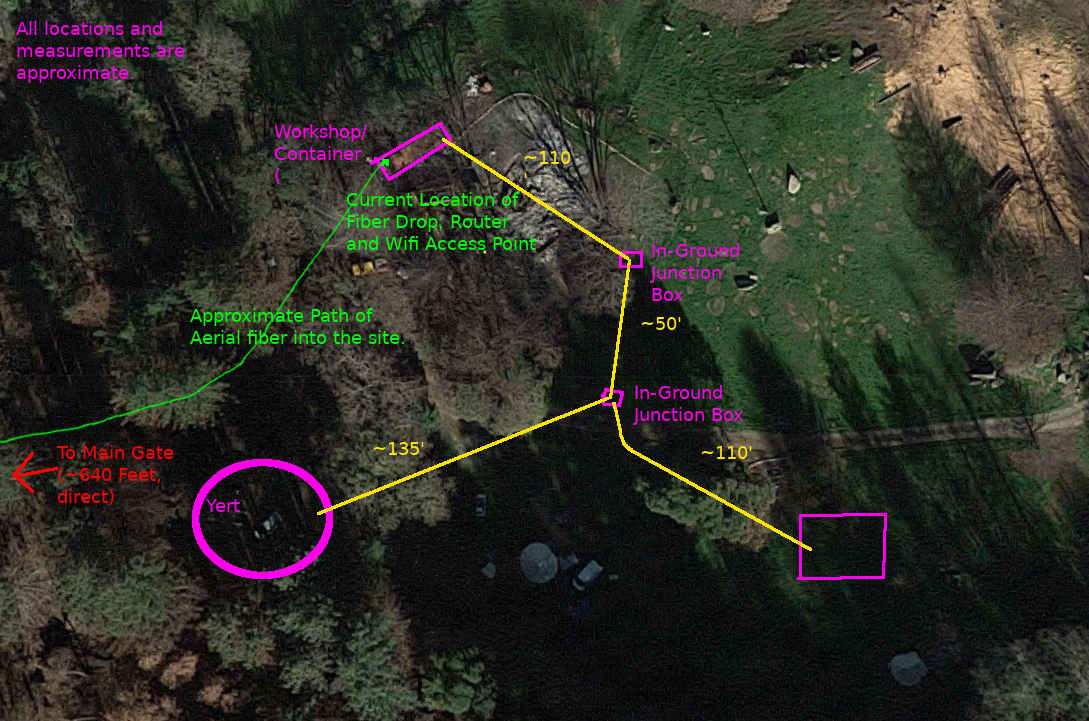
At the time I started, there was a Nokia Optical Network Terminal and one of AT&T’s router/Wifi Access Point all in one boxes at the front door to the shipping container workshop. All the users of the network connected via WiFi, with mixed results, especially at range. My goal was to create a hard-wired connection to the future site of a Yert that the owner of the land would live in as he constructed a more permanent replacement home. At the time, there was some conduit in the ground, laid with the plan of pulling cable through later. The overall arrangement of the site looked a bit like the following figure.
My goals were:
- A Gigabit connection to the Yert
- Better Wifi for everyone
- A guest network
- The ability to have local resources available on the LAN
- The ability to connect to the front gate later on, once the core network is complete.
This gives me a few options to connect the buildings, each of which has its own advantages and disadvantages.
- Mesh Wifi
- Both Ubiquiti and Mikrotik offer a way to set up the Wifi access points as a ‘mesh’, where one Wifi Access point gets its backhaul from another. This has the advantage of the least-expensive infrastructure: All one needs to do is have multiple Wifi Access points in range of one another and configure them properly. This has some significant downsizes in performance, however. Beyond that, the land owner very much preferred a wired network.
- Point-to-Multipoint
- If one sets up a separate set of wireless gear to backhaul the connection from building to building and then use relatively short runs of Ethernet inside each building to connect them together, one can avoid the worst preformance bottlenecks of a mesh system. In fact, there are options that can deliver full gigabit speed wirelessly, such as the Mikrotik Wireless Wire, which operate outside the usual spectrum occupied by Wifi. This approach is more expensive than having the Wifi access points hand their own backhaul, but it still doesn’t involve putting conduit in the ground.
- Twisted Pair Ethernet.
- Good old fashioned Cat5e/Cat6/Cat6A twisted pair. For many this is synonymous with ‘Ethernet’ (things like Wifi and 10Base2 not withstanding) and is by far the most common form of wired home networking. As such it’s relatively easy to work worth and relatively cheap. It can even carry Power over Ethernet (PoE), allowing one switch to power another. The big disadvantage of twisted pair is the relative lack of range. Typically, twisted pair is only supposed to go ~300’ total, and some of the distances involved came close to exceeding that. There are PoE powered repeaters on the market, but that adds to the expense and one has to physically find a place to put these repeaters. While it has better throughput and reliability than most wireless network systems, physically running the cable can be difficult and expensive.
- Fiber
- Fiber optic cable offers excellent range and even faster throughput than twisted pair copper. The downside is that it requires specialized tools and rather expensive connectors to install and that cable can be relatively fragile. Amazingly enough, fiber optic cable itself isn’t that much more expensive than even Cat6A twisted pair. The biggest reason fiber is more expensive and less widely used for home networking than twisted pair is the expense and difficulty of terminating cables and the added expense of some sort of media converter or fiber optic module at each end.
Ubiquiti vs Mikrotik vs Something Else Entirely⌗
There are two companies that are quite well known in the small business and Wireless ISP space: Mikrotik and Ubiquiti. Both of these companies make some gear with some rather interesting features designed for network and IT professionals, but they each have a bit of a different design philosophy. Mikrotik’s equipment focuses on maximum configurability and versatility. Even their consumer-grade routers and Wifi access points support things like Border Gateway Protocol and OSPF. Ubiquiti focuses more on have a more user-friendly management system known as UniFi to manage switches, routers and Wifi access points, and having easier to configure point-to-point and point-to-multipoint links that expose fewer features to their users. Most importantly for our usecase, both have support for a captive portal login system for the guest network and a system to centrally re-configure their Wifi access points, which is handy to update the SSID or password when one has several wifi access points deployed around the property.
I also looked into some other systems. TP-Link has something known as Omada, and Netgear has their own line of controller managed wifi gear. We ultimately rejected both of these because the controller software wasn’t as well developed or easy to deploy in our environment as either CapsMan from Mikrotik or UniFi from Ubiquiti. I even considered a system known as OpenWisp, which at the time seemed a bit too experimental for our purposes, though I am once again considering it for my own home Network.
Ultimately we decided on Mikrotik hardware in part because several pieces of hardware were less expensive for similar capability and because it their software exposed so much configuration flexibility.
No Plan Survives First Contact With the Problem⌗
No plan of operations extends with any certainty beyond the first contact with the main hostile force.
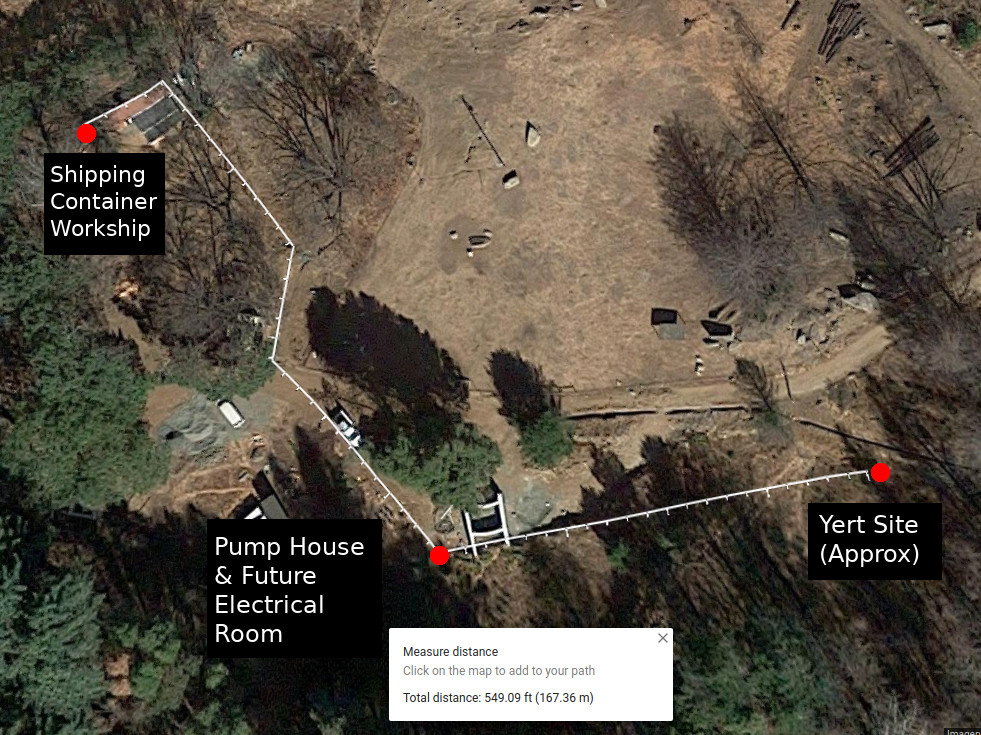
As I went over the plan with the land owner, it was clear that a few things had changed. The Yert was moving east, there really wasn’t much need for my PoE cleverness and fiber optic cable was back on the menu. In this application we choose OM3 multitude fiber because it supports 10 Gigabit Ethernet over the distances between buildings required. This amount of throughput was probably overkill for the immediate future, but since fiber lived underground it seemed like a worthwhile upfront investment.
Before we could pull the fiber though, there were several other jobs to do on the property that demanded the resources or the mini-excavator and the folks would would be laying conduit. To bridge the gap, I ultimately did set up a mesh network using the Mikrotik Wireless Distribution System (WDS) feature. I put a wAP AC on top of the shipping container, on top of the pump house and in the Yert. Amazingly enough, this arrangement was able to manage a good 50 Mbit/second end to end, despite 4 (sometimes rather long) wireless hops. This was good enough to allow the land owner to move into the nearly-completed yert and still be able to work from home. So far so good, but there was still work to do. We still had to pull and terminate fiber end to end.
DIY Fiber⌗
The decision to go with fiber wasn’t something we did lightly. Fiber optics isn’t typically considered a DIY job and I had to a lot of research into how exactly one works with fiber optic cable. The first choice was choosing exactly what grade of fiber optic cable to use. We had the choice between several different grades of both Singlemode and Multimode fiber. I figured that OM3 would support 10Gigabit Ethernet over the ranges in question, and that it would be the most forgiving type of fiber to work with. Then we had to figure out how we were going to terminate the cable on each end. While there are companies that make pre-terminated Fiber optic cables, we opted against that possibility. The pre-terminated cables are significantly more expensive than doing your own field terminations (especially given that my labor is free in this case!) and they require that you have somewhat exact measurements of distances between points, which isn’t particularly easy.
Many of the things one might need to terminate fiber can’t be bought from the usual consumer sources. While there are some surprisingly cheap fiber termination kits floating around Amazon, one would have to elsewhere to pick up the mechanical splice connectors that one would use with tools. Beyond this, there’s a certain nuance in stripping and preparing fiber for mechanical termination that doesn’t necessarily come across on YouTube videos on the subject. The experts demonstrating the use of the tools are able to work far more quickly than I ever could. As a result, I often found myself often missing small but important parts of the process when I attempted to learn from their videos.
One particular issue I’ve noticed that it is absolutely necessary to have the correct fiber strippers. While the jacketed fiber cable itself is relatively tough, the fiber inside is quite delicate. Using the wrong size strippers is enough to break the fiber inside, but only some of the time, leading one to think that with the right care one could make the wrong strippers work. For our Spool of outdoor riser-rated 2-fiber cable, I needed a pair of strippers that were designed to deal with the 900μm tight buffered fiber. Even with the correct tools, one had to take care to make sure that the fiber was seated in the strippers correctly. It’s very easy to miss the notch that’s intended to strip the buffer tube off the fiber and simply cut the fiber instead of stripping it.
Another item is how to protect the termination. I ended up using Keystone jacks that had an LC coupler built in, and ordinary keystone wall plates and surface mounts. If I had to do the job again, I probably would have insisted on have a purpose-built fiber termination box for each termination. Things like this and the cost of the connectors makes up the lion’s share of the cost of running fiber around the premises. The cable itself isn’t that much more expensive than Cat6A. Of course there’s also the cost or effort of labor in terminating the cable. Expect to make some mistakes your first time attempting to do your own fiber terminations and have a bit of frustration at times. One simply can’t rush the fiber terminations the first time through.
Anything that can go wrong…⌗
Beyond the hiccups in learning to do my own fiber terminations, the folks working along side me and I encountered a number of other issues along the way:
- At one point, a truck managed to damage some of the conduit that was in an uncovered hole by rolling into it. This required re-working the damaged conduit.
- Some of the conduit that had been laid with the initial electrical trenches ended up being filled with mud by the time that we were ready to pull cable through it.
- At one point, I managed to ruin a pair of the somewhat expensive AFL connectors by breaking the fiber in them.
- Plans changed yet again to include building a permanent electrical and data room that was to be built someday in the future. Since I wanted to avoid pulling fiber more than once, I had to come up with a weatherproof means of setting up the core switch outdoors. In hindsight, I may have been better served by asking for a Mikrotik FiberBox.
- Running conduit into the Yert for data was delayed multiple times. This resulted in a folks finishing a fiber pull, only to see it broken and needing to be redone.
- All work on the site was interrupted by the Kincade fire, multiple windstorms, an early start to the wet season, and the occasional escaped goat.

In short, I have several good reasons for the task taking as a long as it did. But it did teach some useful lessons. It was my first experience working with PVC electrical conduit. Here I learned that one can directly glue flexible PVC conduit to hard conduit. I helped pull cable through long lengths of already buried conduit using a technique that involves using a vacuum to pull the line though. I also saw some or the issues with that technique, as useful as it is: The plastic-bag piston can get caught up on fittings. And conduit that’s left idle long enough without being sealed up will fill with mud and be utterly useless for future cable pulls. I saw ho the cost of conduit and fittings add up. In some cases it can cost as much as the switches and routers do. Avoiding this this cost the biggest advantage of point-to-point wireless and direct burial cable.
Despite my frustration with termination at times, I did discover that fiber is within reach of a motivated do it yourself-er. If you’re willing to deal with cost and frustration of termination, it’s a great option to deal with runs that have to go further than the 300’ limit of twisted pair, which is a common issue on a larger property like the one I was working on. Even very affordable Mikrotik routers and switches have SFP cages on them, allowing one to install optics that have far greater range than that hardware’s 1000BaseT Twisted Pair Ethernet ports have. And as I previously mentioned, the fiber optic cable itself isn’t that expensive even if the terminations are. It may not be the best option for every home application, but it is a practical option for anyone willing to put in the work of terminating it or the pay the expense of buying pre-terminated cable.
Some of the most difficult decisions in this project came from balancing the most immediate concerns with future concerns. These trade-offs are a bit harder when dealing with physical cabling than in most software problem that I’m used to dealing with because changing the configuration of some fibers buried in the ground is much more difficult than changing some lines of code. Futureproofing is a valid request when it comes to burying cable, but even there there’s only so far one can go in this direction before it starts to interfere with getting things done and usable right now. This makes me thankful for the WDS-Mesh feature that Mikrotik Wifi Access Points have. In this installation it took a lot of the pressure off of me because it allowed us to have a working (if somewhat slower) network while I we were pulling and terminating fiber.
Conclusion, for now⌗
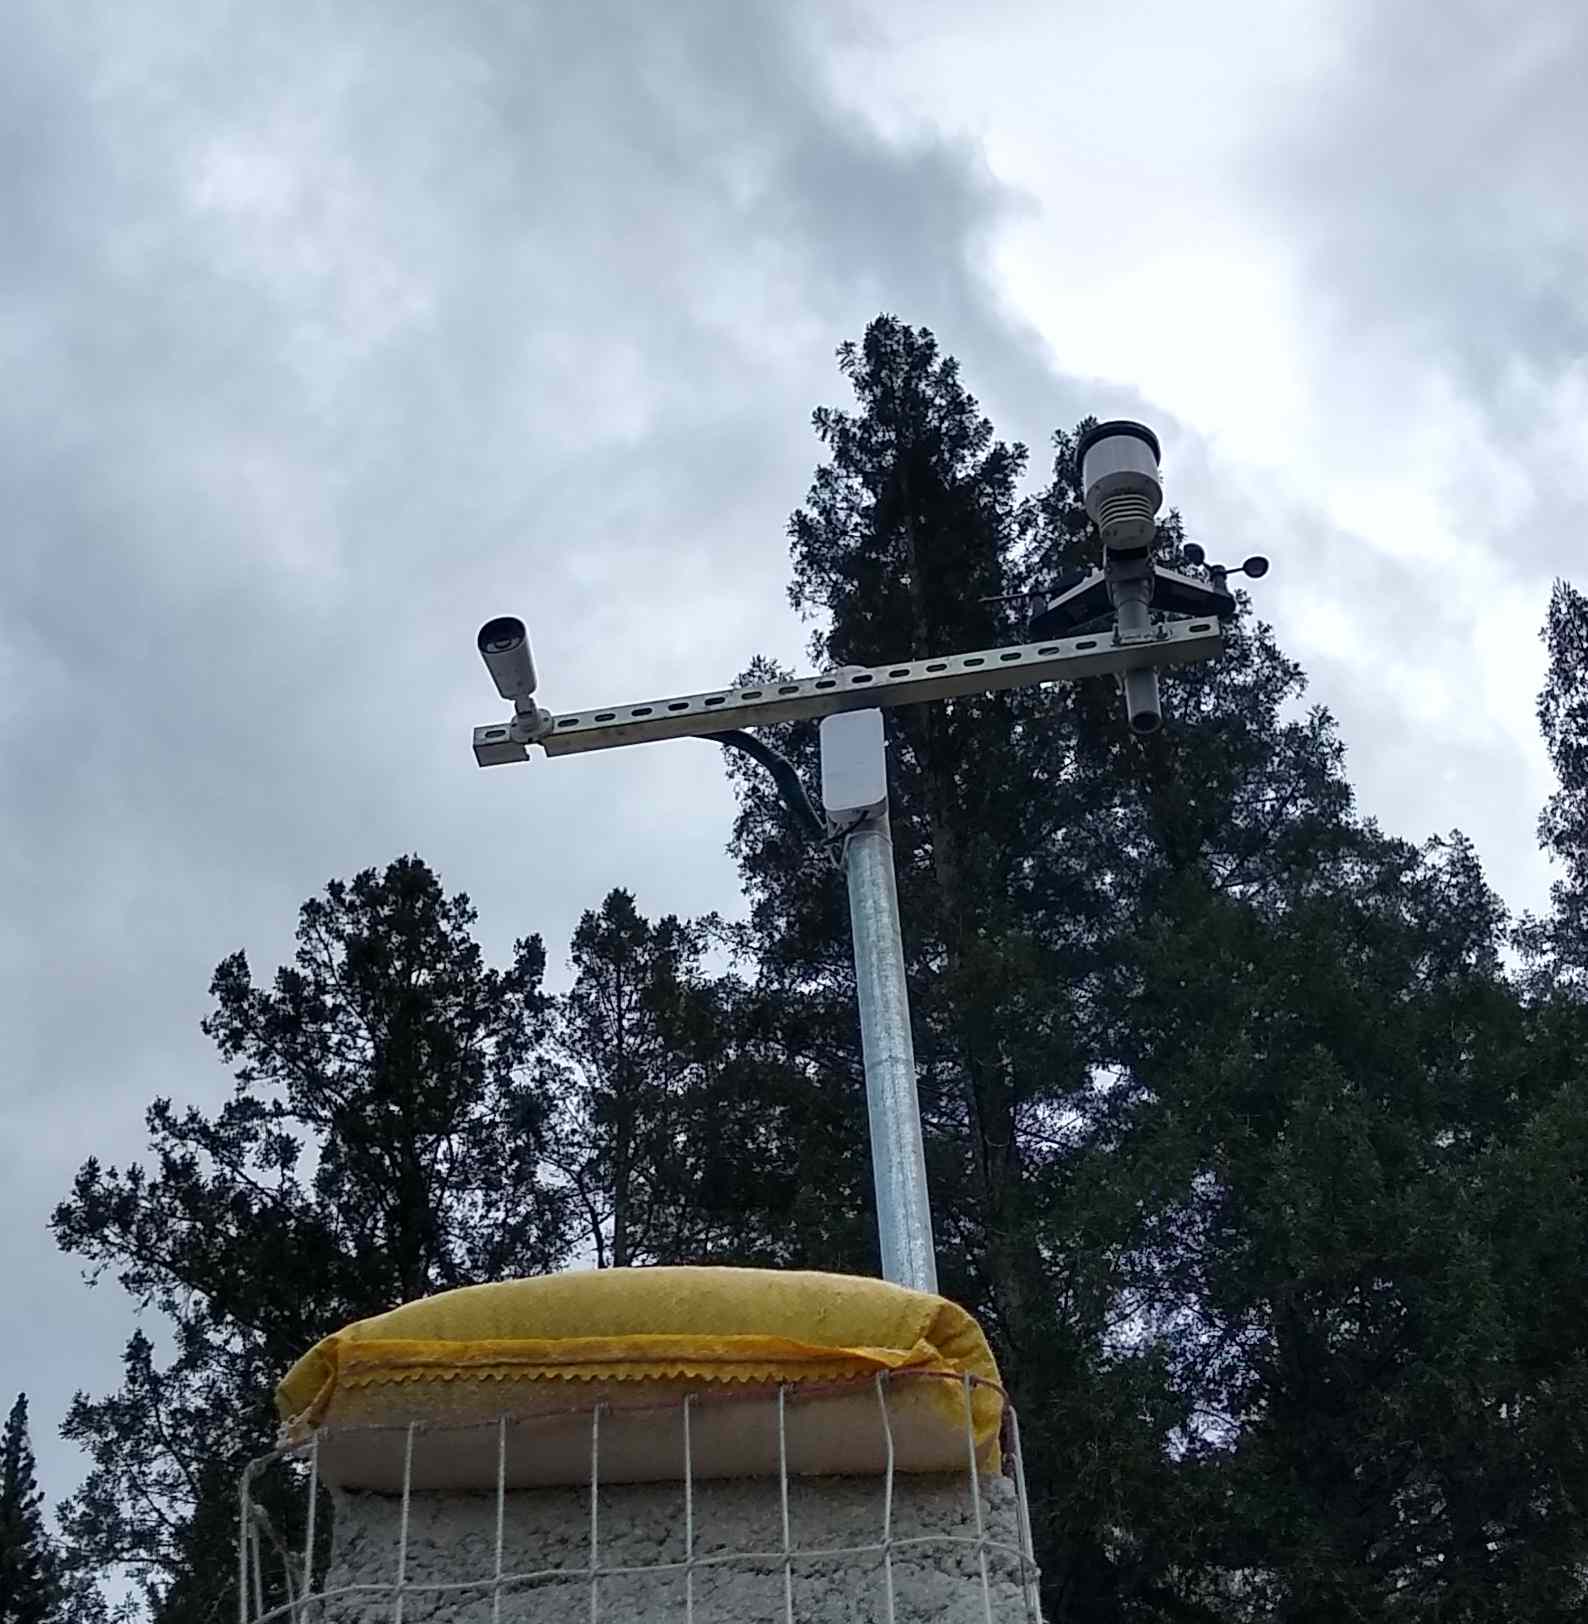
To spite all the issues along the way, I ultimately did get it done. For now… There’s real talk of extending the network out to the front gate to allow there folks to buzz visitors in. I’m looking into using point-to-point links to extend the network to my friend’s campsite on the property. I’d love to place an ADS-B receiver alongside a weather station and AP on a pole at the weather station. And we may end up moving the AT&T equipment up to the pumphouse location. Projects like these are never completely done, but getting fiber working between the workshop, pump house and Yert is a major milestone. To get this done, I learned a lot about how to configure RouterOS and how to terminate fiber. I had to deal with scope creep, being blocked on dependencies, and a rather mean rooster a times. All and all it was a fun project.